
· 5 min read

-Make a personal Japanese tutor in a few minutes

This is an article by Chase Zhang, Twitter @ant_sz

Over the past year, Large Language Models (LLMs) have seen burgeoning growth and development. As a data systems enthusiast, it’s essential to explore and study this hot field to stay updated. This article summarizes my recent experience in developing LLM applications using flows.network under Rust.

Concepts around Large Language Models

When talking about LLMs, ChatGPT and OpenAI immediately come to mind. Despite OpenAI's recent change in CEO, their significant role in advancing and promoting LLMs is undeniable. From the perspective of individual developers and small companies, training and deploying LLMs is impractical. As a data system developer, I prefer to represent the concept of LLMs as follows:

Concept of LLM

From an application developer's perspective, LLMs can be viewed as functions composed of massive training data. Since this function is static, it requires Prompts and Context as inputs during use. The function's role is to generate outputs most likely to meet user needs based on the Prompt and Context. This output, together with the user’s input (Chat), is fed back into the LLM as new Context. LLM Concept 
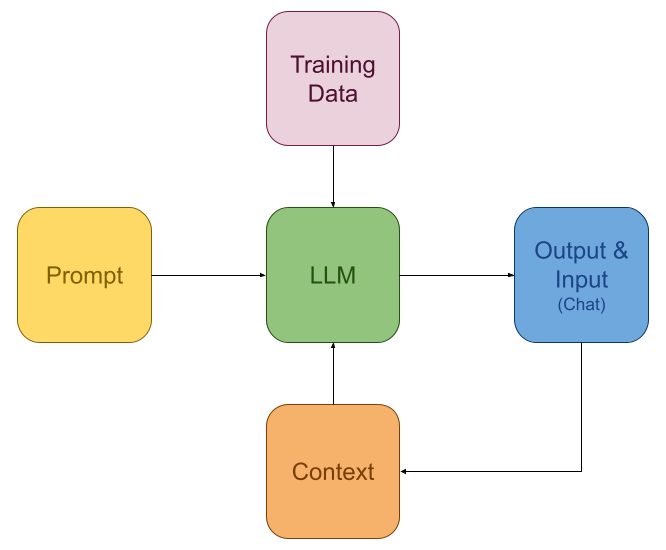
This mindset allows LLM developers to focus less on the internal details of LLMs and more on preparing inputs for this “function.” Of course, there are nuances in prompt-tuning, but today's LLMs are remarkably “smart” and often produce effective results with simple prompts.

RAG and Vector Store

RAG (Retrieval Augmented Generation) and Vector Store are essential in LLM applications. RAG, a term that emerged with the rise of LLMs, addresses the challenge of LLMs in quickly utilizing new knowledge. For example, ChatGPT has long been limited to answering questions based on pre-2021 knowledge. While Fine-tuning can solve this, it's a costly and slow process.

Initially, RAG utilized Vector Stores for information extraction, primarily in Q&A systems. Traditional keyword-based query systems often fail to return relevant results for natural language queries. Thus, Vector Stores, combined with a language model, compute Embeddings (vector data). These stores then use similarity calculations to extract relevant information as Context for LLMs. The traditional Vector Store-based RAG process is depicted below:

Usage of Vector Store Vector Store 
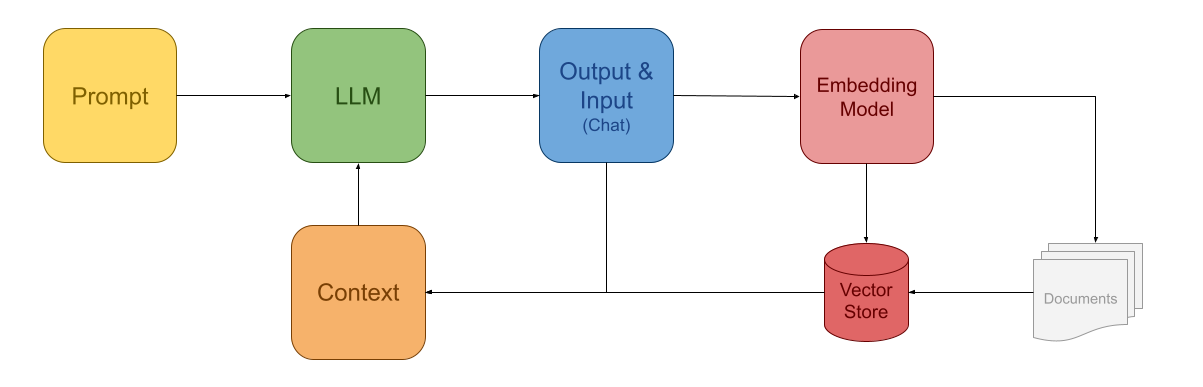
In this framework, the Embedding Model converts both user queries and existing documents into vectors within the same metric space, ensuring similarity. When calling the LLM, the extracted information serves as Context, allowing the LLM to answer various questions, including those on newly added documents. However, this framework’s capability can sometimes be limited by the performance of the Embedding Model.

RAG and Assistant

A more powerful RAG framework, based on the so-called Assistant model, has recently gained popularity. The Assistant acts as a third agent-like role in the interaction between the LLM and the user, similar to a chatbot. It can accept commands output by the LLM, execute queries, and return results as Context. This model is illustrated below:

Assistant Framework Assistant 
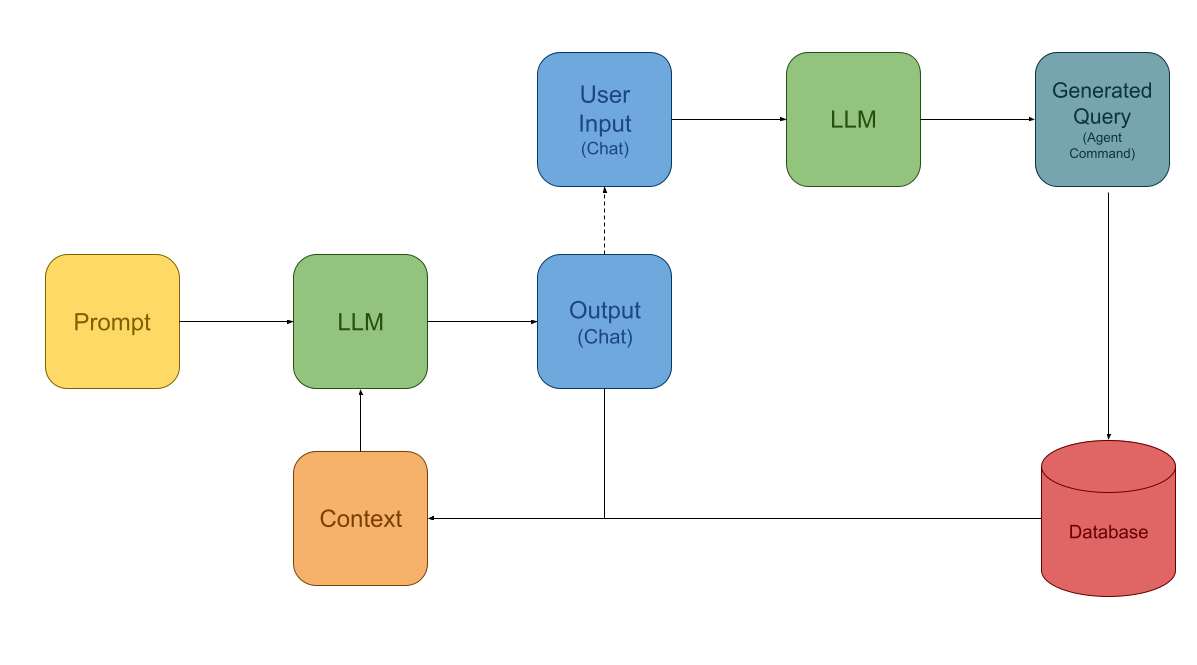
This model is based on a simple yet effective idea: LLMs are powerful enough to translate user questions into formatted statements, such as SQL or JSON-described function calls. If LLMs first output commands they believe can retrieve data, and an Agent executes these queries and returns the results to the current session’s Context, the LLM can access the latest information. This flexible approach allows querying traditional databases without pre-processing with an Embedding model. Moreover, LLMs can conduct multiple rounds of queries before returning results, making this a highly powerful framework.

Additionally, the Assistant framework can control external systems, not just data queries, significantly expanding the potential applications of LLMs.

Development of LLM Applications

As average developers, we might feel powerless regarding significant framework developments in LLMs. However, we can still build useful tools using available resources. Currently, the most popular LLM framework is perhaps LangChain. Essentially, these tools are workflow management tools that allow users to weave their application logic into executable workflows.

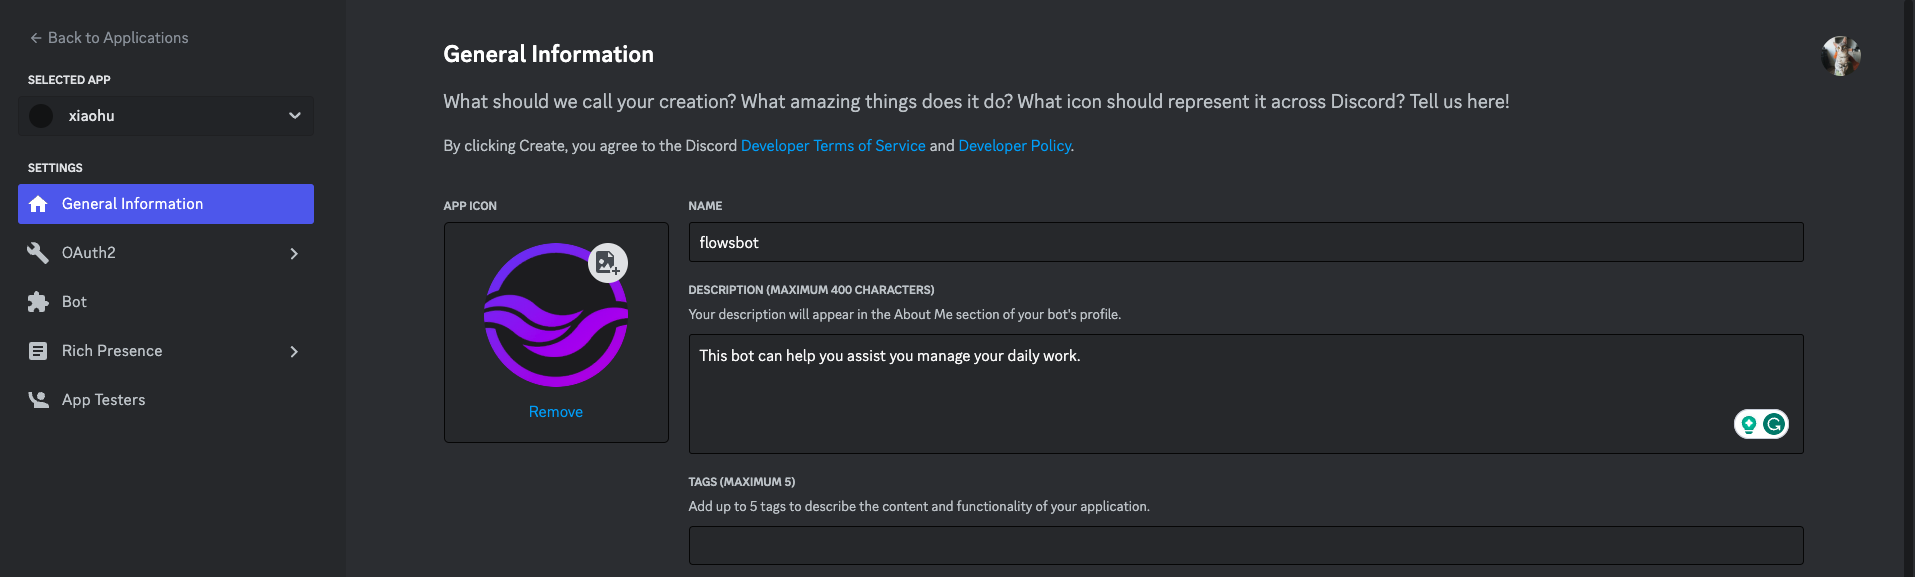
Here, I chose flows.network, a Rust-implemented serverless LLM workflow platform, to develop a Telegram GPT application. It offers various callable methods and tools to help outline your LLM application flow. Your application is compiled into WebAssembly and runs on the hosted platform provided by Flows.Network, which is currently free.

Flows.Network Supported Integrations

The above image shows the integrations provided by Flows.Network. These interfaces are implemented as APIs with callable Rust SDKs. Users need only focus on organizing application logic and calling these methods. One reason for choosing this over LangChain is its lightweight framework, which avoids widely complained heavy abstractions in LangChain.

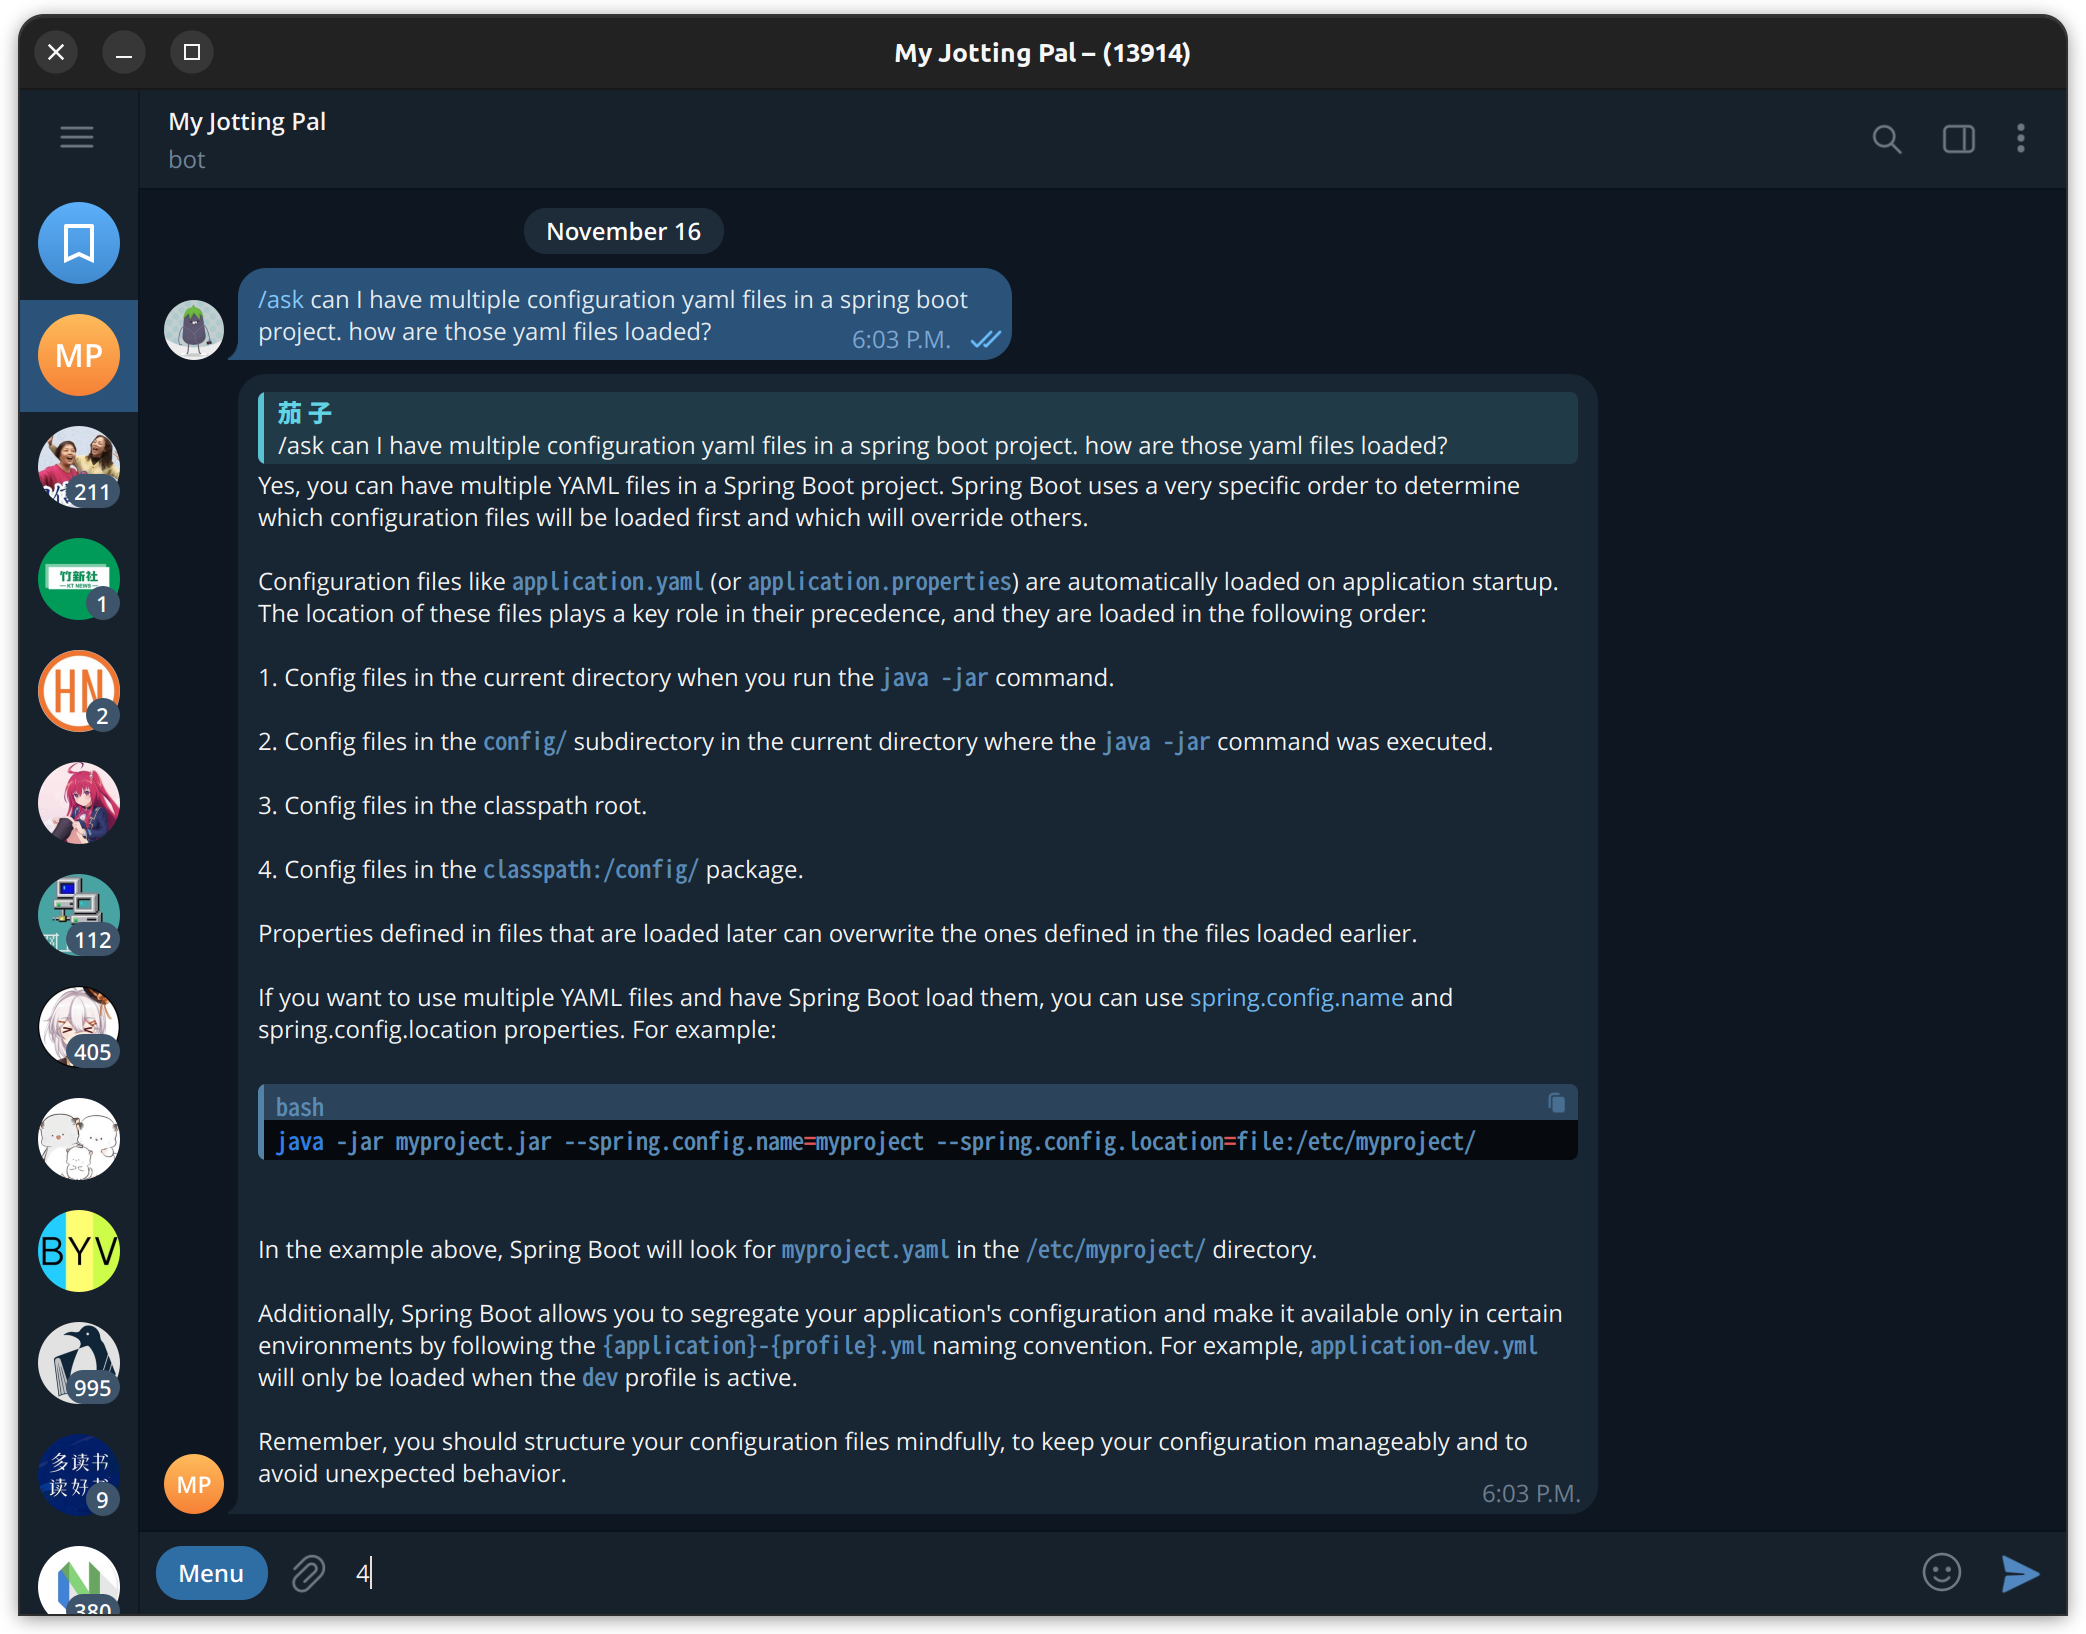
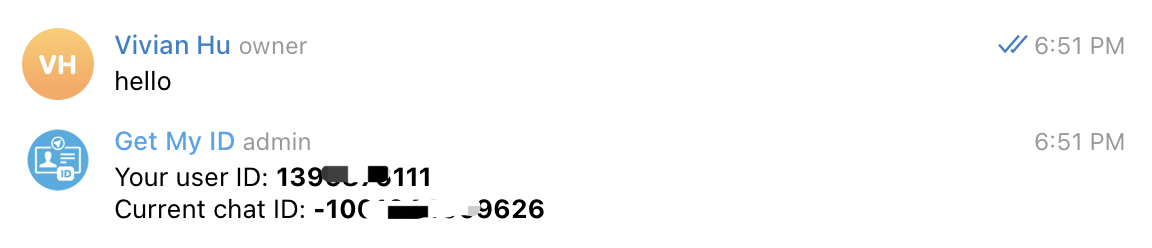
I used Flows.Network to create a Telegram Bot for Q&A and learning Japanese, which you can find at https://github.com/shanzi/Telegram-ChatGPT. The Bot supports simple commands and maintains conversation context with Reply-To:!

Q&A Mode Screenshot from 2023-11-18 17-33-23 Japanese Learning Mode Screenshot from 2023-11-18 17-35-12 Notably, to handle Telegram’s peculiar Markdown syntax, I wrote a parser using Nom to process and escape Markdown syntax in ChatGPT’s output. See the src/markdown.rs file for details.

Currently, Flows.Network requires WebAssembly for building, which hinders local execution and debugging. This can be a drawback, but proper configuration allows automatic build and deployment upon pushing to your GitHub repository, providing a convenient writing experience, which compensate for this drawback.

Conclusion

This article introduced general concepts of LLM applications and shared my experience using Flows.Network to develop an LLM application. I personally enjoy writing LLM applications in Rust, and Flows offers needed APIs, freeing me from dealing with various interfaces. The convenience of deploying FaaS with Wasm is also commendable. I hope to see more platforms like this emerge to facilitate the development of diverse GPT applications.

Feel free to Fork and try out my Telegram Bot: https://github.com/shanzi/Telegram-ChatGPT


· 3 min read

Introduction

Telegram is a popular messaging platform that allows users to communicate with individuals or groups through chats. In some cases, you may need to find the Chat ID or Group Chat ID for your Telegram conversations. In this guide, we will walk you through the process of finding the Telegram Chat ID and Group Chat ID.

For a Telegram bot token, please check out How to get a Telegram bot token.

The chat ID and group chat ID is not easy to get. The official Telegram bot @botfather doesn’t provide any information about chat ID and group chat ID. However, the telegram bot ecosystem is prosperous. We can solve this problem with a bot called Get My ID. After trying several bots, I found this bot the easiest one.

Next, let’s learn some basic concepts. Telegram has three different kinds of chat IDs, one is for a telegram bot to send DM, which is simply called chat ID. The second one is for a telegram bot to send and reply to messages in a group, which is called group chat ID. The last one is for a telegram bot to send messages in a channel, which is called channel chat ID. The telegram channel is more complicated and we will cover this part in another independent article.

What’s the difference between a Telegram group and a channel? The Telegram group allows the members here to send and reply to messages from each other. While the Telegram channel is more like a notification system. Only the designated users can send messages in the channel. The subscriber of the channel only can read the messages or react the messages with emojis.

Despite their distinctions, all three types of ID are unified under the umbrella term chat_id in Telegram's API documentation. However, they assume distinct roles and are made up of different parameters. Therefore, it is crucial to specify the type of Telegram bot you intend to develop.

How to Find Your Telegram Chat ID

To obtain your chat ID, simply send a direct message to the Get My ID bot, and the bot will promptly respond with your user ID and Current chat ID. Both values are identical, so it matters not which one you choose to copy and paste. This ID is needed for a bot to interact via direct messages.

How to Find the Telegram Group ID

To get a group's chat ID, invite the Get My ID bot to the group. Once it joins, send a message in the group chat. The bot will respond with your user ID and Current chat ID. The Current Chat ID, starting with a hyphen (-), is the group chat ID. Note that if the Get My ID bot is present in multiple groups, the “Current chat ID” will alter accordingly. Therefore, exercise caution to ensure that you invite the Get My ID bot to the intended group.

In summary, message the Get My ID bot for your personal chat ID, and invite it to a group for the group chat ID. We will introduce how to get a channel in the next article. Please stay tuned!

Next, you can build a Telegram bot to summarize and send the Hacker News Post that you're interested in.

· 4 min read

Intended originally for gamers, Discord has evolved into a popular platform for online communities. The versatility of Discord lies in its bots - automated programs that interact with users and add functionality, improving the user experience. From tracking games and assigning roles to playing music and more, Discord bots bring unique utility to the digital world.

Today, some companies essentially run their entire business on Discord using bots - Midjourney is a prime example. Midjourney's AI art bot handles all of its operations through Discord, allowing users to generate images via text prompts. Having an appealing profile helps your bots stand out and attract more users, just like Midjourney's.

Why Optimize Your Discord Bot's Profile

Optimizing a Discord bot's profile is like polishing a diamond. As developers, we invest time and effort into designing and programming these bots to perform specific tasks. However, presentation is just as critical as functionality. An optimized profile not only improves the user experience but also enhances the bot's credibility and effectiveness.

With an optimized profile, your bot maintains a consistent identity, becoming easily recognizable to users. It also clearly conveys the bot's purpose and capabilities, reducing confusion. Additionally, an appealing and professional profile can increase server engagement.

Optimizing isn't merely about aesthetics and user engagement, either. From a technical standpoint, optimized bots can use server resources more efficiently, reducing lag and latency. By refining your bot's code and permissions, you ensure that your bot carries out its functions smoothly and without error, contributing positively to the overall health of your server.

In this article, I will show you several ways to make your Discord bot profile attractive.

Add an Icon, Description, and Tags for your Discord bot

An icon and clear description can help users understand what your Discord bot does.

To add the above information, you can simply go to the Discord Developer Portal and click your bot icon. Then you will be redirected to the bot details pages.

Click the General Information tab on the left, you can upload an icon, edit the description, and write some tags for your Discord bot. Before you leave this page, make sure you have saved the changes.

With a good icon, description, and tags, your bot's purpose will be clear on its profile.

Get an "Add to Server" Button

If your Discord bot is public, like Midjourney, you may want others to be able to add it to their servers. You can add an "Add to Server" button to your bot's profile. You can customize the link it points to, like your bot's invite link or a landing page.

To add this feature, we still need to go to the Discord Developer portal and enter the bot detail page.

  • Click on the OAuth2 tab on the right
  • Click on the General tab on the right
  • Go to find the Default Authorization Link and choose Custom URL
  • Add your URL in the box
  • Save the changes before you leave.

Please note that your bot must be public to activate this feature.

List the Top 5 Slash Commands on your Discord Profile

Discord recently released a new feature “Try my commands” to list the top 5 used slash commands of your Discord bot, which can help user onboard your bot quickly.

However this feature is only open to verified Discord bots. To be verified, your bot must be in over 75 servers. Once verified, if your bot has at least one global slash command, its top 5 most used slash commands will automatically appear in the "Try My Commands" section.

There are many other tips to optimize your Discord bot. We'll continue adding to this article, so stay tuned.

Flows.network is a serverless platform for developing, building, and hosting Discord bots that connect to external web services and other SaaS tools.

Here are some tutorials for you to get started:

· 5 min read

Flows.network is a serverless platform that allows you to build and deploy LLM applications without worrying about infrastructure management. In this guide, we will walk you through the process of building a ChatGPT Discord bot using flows.network, step-by-step. More importantly, you don’t need to master any coding skills.

This bot can

  • Customizable prompts - You can copy and paste any prompt for the bot to respond to. Feel free to get creative!
  • Direct message responses - Have a private conversation with the bot by direct messaging it.
  • Channel message responses - The bot can respond to messages posted in channels, allowing all channel members to interact with it.
  • External service integration - Services like OCR can be integrated to expand the bot's functionality. For example, the bot can process images with OCR.

1. Get a Discord Bot Token

To get started, you need to have a Discord account. And then follow these steps:

You can also refer to How to create a Discord chat bot for more information.

1.1 Create a New Application

  • Visit the Discord Developer Portal and log in with your Discord account.
  • Click on "New Application" and provide a name for your bot.
  • Navigate to the "Bot" tab and click on "Add Bot."

1.2 Obtain Bot Token

  • Go back to the "Bot" tab and click on "Copy" under the "TOKEN" section. Keep this token secure as it will be used to authenticate your bot.
  • Turn on the "PRESENCE INTENT", "SERVER MEMBERS INTENT", and "MESSAGE CONTENT INTENT" settings.

1.3 Add a Bot to Your Application

  • Under the "OAuth2" tab, select the "bot" scope.
  • Scroll down and select the required bot permissions based on your bot's functionality.
  • Copy the generated bot invite URL and invite the bot to your server. You can see your bot is offline.

2. Set up a flows.network Account

Now that you have set up your Discord bot account, let's set up a flows.network account.

  • Visit the flows.network website and sign up for a new account with your GitHub account.

3. Create the Discord ChatGPT Bot on flows.network

All the preparations are ready. Let’s create a Discord ChatGPT bot from a template.

3.1 Load the ChatGPT Discord Bot template

Click here to load the ChatGPT Discord bot template.

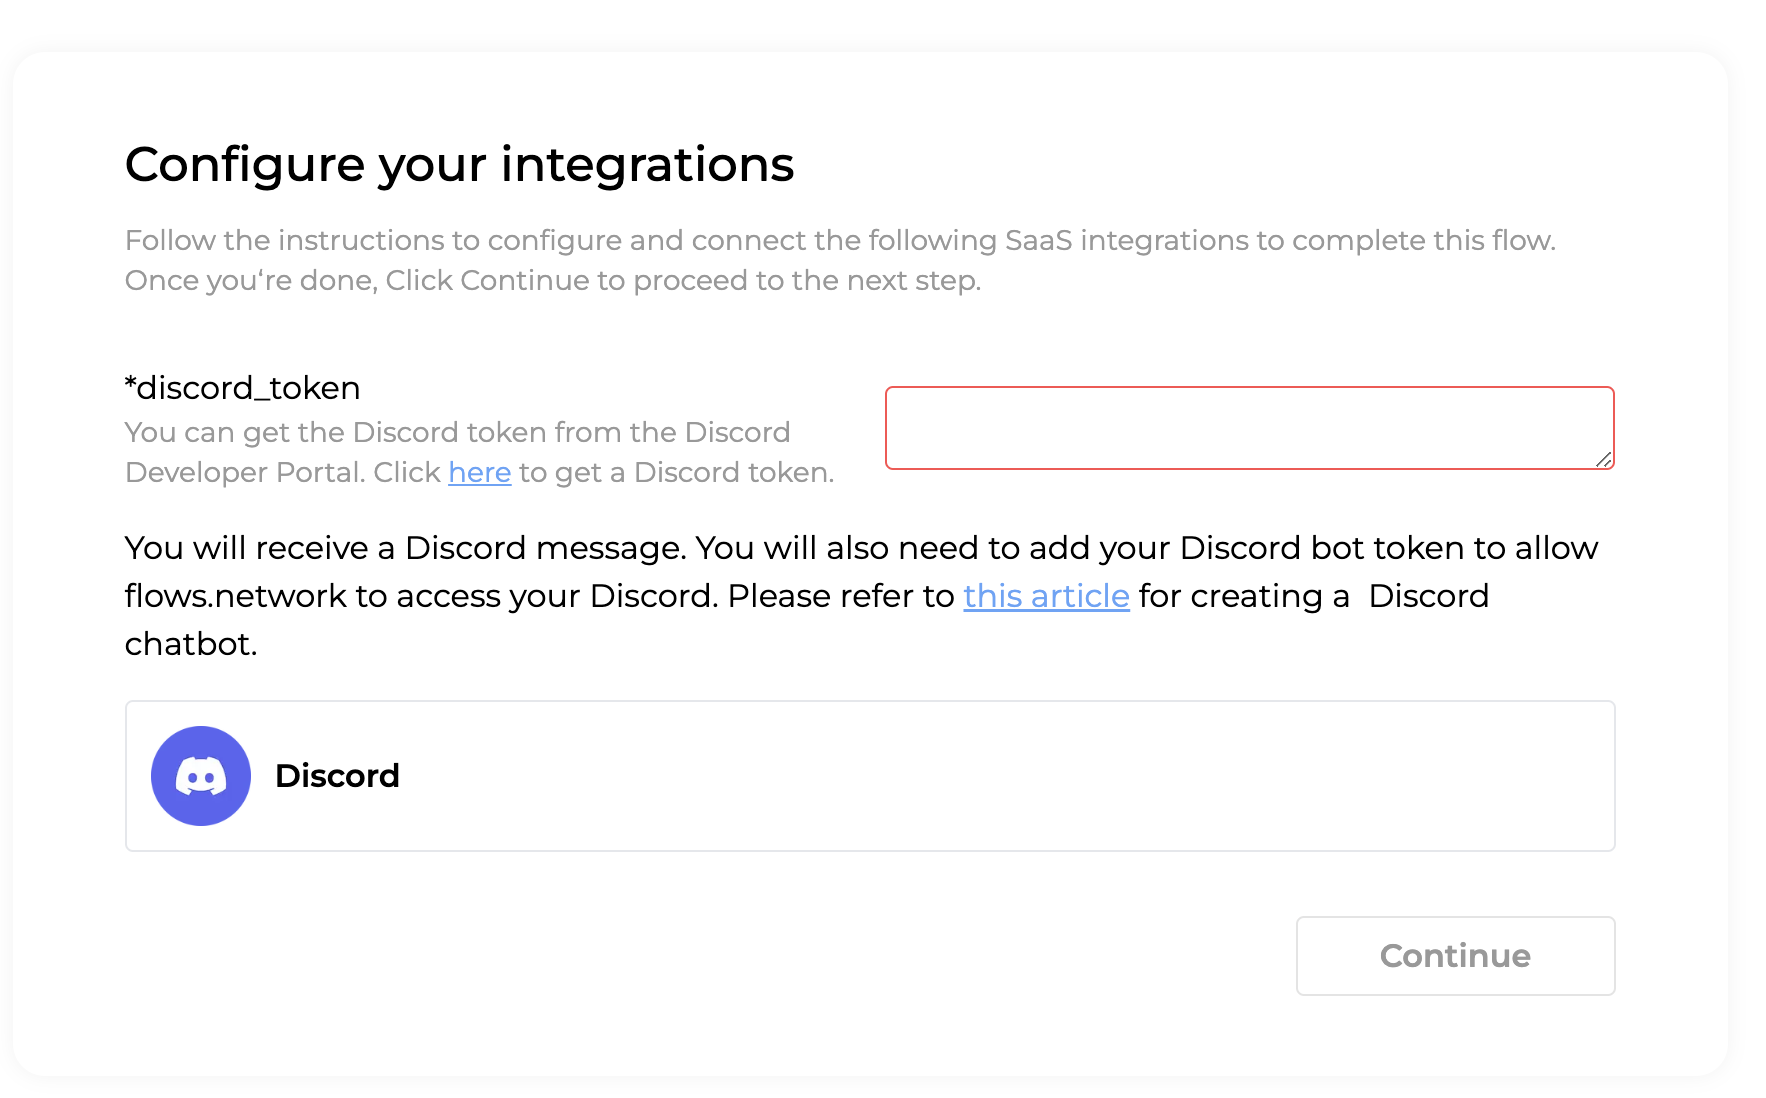
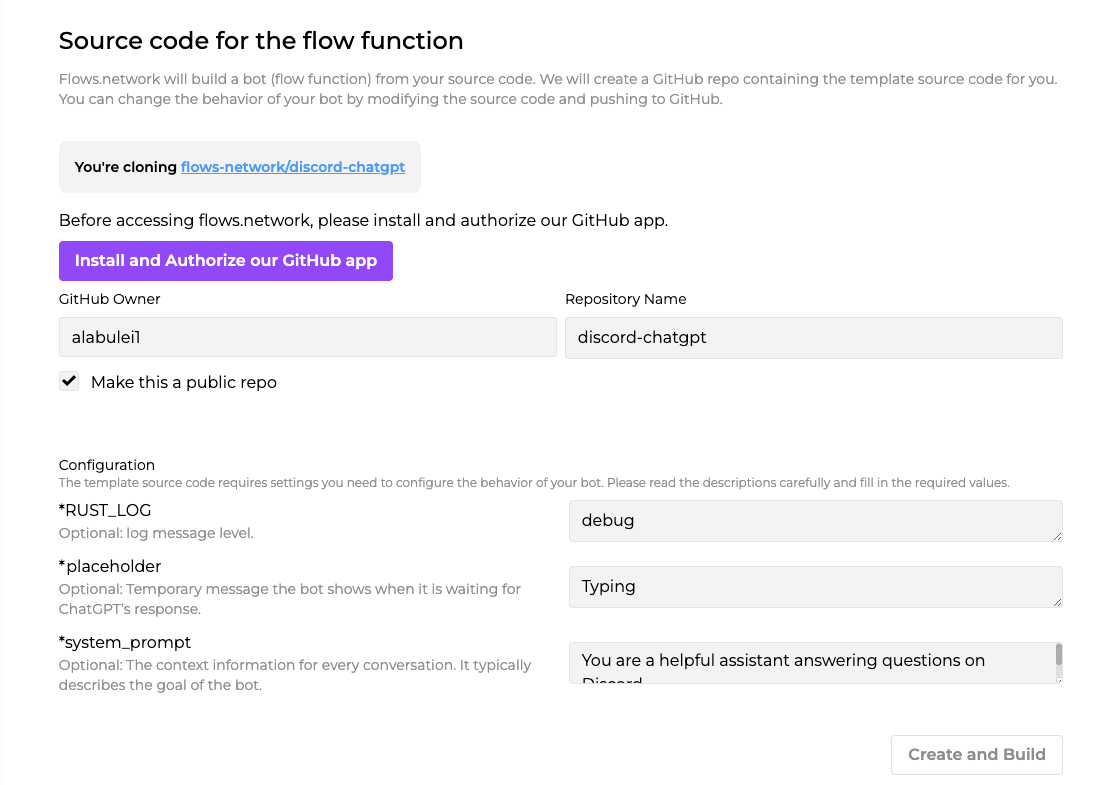
Click the purple Install and Authorize our GitHub app to grant flows.network to access your GitHub repo. After that, review the system_prompt. You can copy and paste prompts from here. The text you input here decides what the role of the chatbot.

Then, Click Create and Build to process.

3.2 Configure the Bot

Next, configure the integrations required by this flow template. It’s Discord and ChatGPT API keys.

Copy and paste your Discord token into the red rectangle. Then click the Continue button.

Next, let’s configure the ChatGPT API key.

Click on Connect, and you will be redirected to a new page where you can copy and paste your OpenAI key here.

Close the tab and go back to the flow.network page once you are done. Click on the Deploy button.

4. Test and Interact with the Bot

Once the status of the flow turns ready and running, go back to your Discord server and you can find the bot is online now. DM the bot and the bot will now answer your questions.

Conclusion

By following this step-by-step guide, you have learned how to build a ChatGPT Discord bot on flows.network, without any coding! flows.network provides a serverless platform to simplify the deployment process and allows you to focus on building engaging chat experiences for your Discord community. Have fun experimenting and building conversational experiences with your new bot!

Other templates using Discord

FAQs

Is flows.network a free platform?

flows.network is currently free to use.

Can I integrate other APIs with my flows.network bot?

Yes, flows.network allows you to integrate various SaaS APIs to enhance the functionality of your bot. You can connect to external services, databases, and other APIs as needed. Check out the Hacker-News-ChatGPT-Discord function, which access API for Hacker News.

What kind of customization options are available for the ChatGPT on flows.network?

flows.network provides configuration options: systerm_prompt to customize the behavior of the ChatGPT bot. And the bot's source code is available in the GitHub repo you cloned from the template. You can set the response length, retry times to guide the bot's behavior if you can change the source code.

Can I deploy multiple bots on flows.network?

Of course, you can deploy multiple bots on flows.network.

You can manually create a new flow and import the source code repo for the bot (i.e., the repo you cloned from the template). Then configure the OPENAI and Discord integrations accordingly.

You can have a single flow function repo deployed as the source code for multiple bots. When you update the source code in the repo, and push it to GitHub, it will change the behavior of all the bots.

· 3 min read

When you use a pre-build template with Airtable, configure these 3 parameters: airtable_table_name, airtable_base_id and airtable_token_name. And you also need to grant flows.network to access your Airtable via the API token provided by Airtable.

NameValueRemark
airtable_table_nameA string of alphabets begins with tbthe name of the table you want to add data, which you can find on Airtable.
airtable_base_idA string of alphabets begins with appthe base id to which the table you wish to add or retrieve data belongs, which you can find on Airtable.
airtable_token_nameA string of word (s)the name of the Airtable API token, which is defined by you.

In this article, I will show you how to configure these parameters to make your flow work.

Create a flow from a template

flows.network will give you the UI instruction when creating a flow from a template.

Configure airtable_table_name, airtable_base_id and airtable_token_name

Generally, you can see the following image.

On the top of the section, you need to enter airtable_table_name, airtable_base_id and airtable_token_name. As I mentioned before, airtable_table_name and airtable_base_id tell flows.network where to add or read data.

So the first step is to go to your Airtable base and get the current URL.

https://airtable.com/appNEswczILgUsxML/tblyMHEVEkFkHM7Z1/viwdHLVHdR603VNlL?blocks=hide

|----base_id-----| |----table_name--|

The base_id is begun with app and the table_name is begun with tb. Copy and paste the two parameters.

The last one is airtable_token_name. Here you can name your API token.

Add your Airtable API token

After typing these parameters, click the purple Connect button to add your Airtable API token. Then you will be redirected to a new page.

Give your Airtable API token a name, which should match the airtable_token_name you set earlier. Then copy and paste your token here. After that, click on the Continue button and you will be redirected to the Airtable integration page, and the token you added will be popped into this page. Then close this tab and go back to the Creating a Flow page to finish the flow. Once you connect successfully, you won’t do it again when you create another flow.

Or you can also add your Airtable token before creating a flow. Once you finish this, you don’t need to connect it again when you're creating a flow.

After you sign in flows.network, go to the Airtable integration page and click on Connect button. Then you will be redirected to a new page.

We need to name your Airtable API token and copy and paste your token here. After that, click the Continue button, and you will be redirected to the Airtable integration page, and the token you just added will be popped on this page.

That’s it. Remember your Airtable API token name because you will use the name when you create a flow.

· 2 min read

A Discord chat bot is a bot user that can receive and respond to private messages, as well as channel messages that specifically mention or reply to the bot user. In order to connect a flow function with a Discord chat bot, you will need a discord_token.

  1. Go to the Discord Developer Portal and log in.
  2. Click on the "New Application" button and give your bot a name.
  3. Next, on the application details page, you can update the app icon, description, tags etc.
  4. Click on the "Bot" tab on the left panel.
    1. Click the "Reset Token" button to get the discord_token. Write down the token and keep it safe!
    2. Turn on the "PRESENCE INTENT", "SERVER MEMBERS INTENT", and "MESSAGE CONTENT INTENT" settings.
  5. Click on the "OAuth" tab on the left panel
    1. Click on "URL Generator".
    2. Select the "bot" scope.
    3. Select the "administrator" permission (or select message reading and sending permissions individually as you need).
    4. Get the bot URL from the GENERATED URL in the bottom of this page.
  6. Finally, use the bot URL from the last step to invite the bot into any of your Discord servers.

Once you connect a flow function to the bot (via the discord_token), all users in the Discord server will be able to message the bot and mention / reply to it in channels.

· 4 min read

Recently, flows.network supports Anthropic's Claude and its newly issued Claude 2 (100k tokens supported). We talked about how to build a Telegram ChatGPT bot. In this guide, I will walk you through the process of building your own Telegram chatbot powered by Claude in just three minutes using flows.network. You won't need to write any code or manage any servers. All you have to do is click a few buttons and provide some information.

With this Claude Telegram chatbot, you can:

  • Customize prompts to prompt Claude based on your needs
  • Chat privately and in a public group
  • Optionally set the maximum token length for your Claude model in the code

Before we start, let’s learn some basic concepts of Claude and the Telegram bot.

What is Claude

Claude is an AI assistant created by Anthropic to be helpful, harmless, and honest. It was designed using a technique called Constitutional AI, which trains language models like Claude through natural conversations. During these conversations, humans provide feedback to reinforce positive behavior and ensure safety and transparency.

By building your own Claude bot on Telegram, you contribute to the development of AI that prioritizes trustworthy and reliable interactions. Your bot's users will experience Claude as a helpful and honest AI partner, designed and trained to uphold those values above all else.

If you're new to Telegram bots, you can refer to our previous article which introduced telegram bot.

Create a Claude Telegram Bot from a Flow Template in Three Steps

The first step is to load the pre-built template for creating a Claude Telegram bot on your browser. Before you click on Create and Build button, you can review the three optional variables like the following image. Here I want to highlight the system_prompt variables. This is for prompting Claude. You can type any prompts here.

The template contains the source code for the bot itself. We will clone the source code to your own GitHub account so that you can modify and customize it later.

Once you have made your customizations, click the Create and Build button, and you will be directed to another page to configure the Claude integration. Next, you need to add your Claude API key. Click on Connect and enter your key.

If you don’t have one, apply here.

Then, you need to add the Telegram token. You can follow this article to get a Telegram token from @botfather. Once you're done, the grey Deploy button will turn purple. Click on the Deploy button in purple to complete the flow.

That's it! Once the function is ready and the flow's status is "running," you can test your own Claude Telegram bot. You can explore different roles for your bot, such as polishing English writing, serving as a writing tutor, or explaining code, by using different prompts.

If you'd like to check out the source code,

Access External Web Service

The bot's flow function can access the web, enabling Telegram to utilize up-to-date information and web services in conjunction with Claude. In simpler terms, you have the ability to incorporate plugin-like functionalities of Claude into your own bot.

For example, you can make HTTPS requests to an external web service to look up the current weather and parse the result from the response JSON data.

fn get_weather(city: &str) -> Result<ApiResult, String> {
let mut writer = Vec::new();
let api_key = std::env::var("API_KEY").unwrap();
let query_str = format!(
"https://api.openweathermap.org/data/2.5/weather?q={city}&units=metric&appid={api_key}"
);

request::get(query_str, &mut writer)
.map_err(|e| e.to_string())
.and_then(|_| {
serde_json::from_slice::<ApiResult>(&writer).map_err(|_| {
"Please check if you've typed the name of your city correctly".to_string()
})
})
}

Combining Claude with the web, your Telegram bot will be just like a ChatGPT Plugin and leverage conversational UI for complex applications. Calling external web services provides more dynamic and real-world functionality. For example, you can call the SendGrid API to send emails based on ChatGPT outputs.

References:

· 5 min read

If you're a hacker who frequents the popular news aggregation site Hacker News, you know how quickly posts can get lost in the shuffle. With hundreds of new stories appearing each day, it can be tough to keep up with the topics that matter most to you. But what if there was a way to be notified anytime a post contained a specific keyword? That's where this article comes in.

I will walk you through how to build a bot to automatically send Slack messages if a Hacker News post contains the keyword you are concerned with on the flows.network platform. You can also extend this Hacker News bot to another SaaS platform that flows.network has integrated, like Notion, Discord, Telegram, Airtable, and so on.

Hacker News Alert

What is Hacker News

Before we start, let’s learn more about Hacker News. If you’re familiar with Hacker News, you can skip the next two sections. Hacker News is a social news website focused on technology and startups. It was created by Paul Graham's investment fund and startup incubator, Y Combinator, originally as a way for Y Combinator founders to share information and news.

Today, Hacker News has evolved into a popular online community for entrepreneurs, tech enthusiasts, and investors to share and discuss news, articles, and information related to technology, startups, and the wider tech industry. The website features a minimalist design that prioritizes original content and discussions over flashy graphics and ads.

Hacker News can be used as a valuable resource for people interested in keeping up with the latest news and trends in the tech industry. By participating in discussions and sharing content on Hacker News, individuals can gain exposure for their own projects, ideas, and businesses, as well as connect with other like-minded individuals who can offer valuable insights and feedback.

Hacker News Alert

Why we need a tool to search and monitor the posts of Hacker News

As an entrepreneur, tech enthusiast, or investor, staying on top of industry news and trends is crucial. However, manually scanning through every Hacker News post each day is time-consuming and impractical. However, with flows.network, it’s possible to build a Hacker News Slack bot to search and monitor keywords that we value. The benefits of the bot are

  • Automatic: It will automatically send you the Hacker News posts via Slack messages at the scheduled time. No need to keep an eye on the Hacker News website.
  • Scheduled and recorded: Schedule a time at your convenience to receive the Hacker News alerts. One of the reasons why we choose Slack is that Slack could help us save the past Hacker News posts.
  • Flexible: You can customize the time you receive the Hacker News post. You also change another SaaS tool like Airtable as a receiver.

How to create a Hacker News Slack bot, taking ChatGPT as an example

Now that we've established the need and benefits for a Hacker News Slack bot. let's take a closer look at how to build your own on flows.network. It's quite easy.

For example, if a post on Hacker News contains ChatGPT, you will receive a message on a Slack channel. This message will include the post’s Hacker News link and the source link of the post.

Make sure you have signed up for an account for flows.network.

  1. Load the Hacker News alert bot template in flows.network. The template contains the source code for the bot itself. We will clone the source code to your own GitHub account so that you can modify and customize it later.
  2. Configure the KEYWORD. Input the area that matters to you, like ChatGPT. Only support one keyword right now. After that, click on Create and Deploy.
  3. Authorize bot access to Slack. The slack_workspace and slack_channel point to the target Slack channel where the bot will send you the ChatGPT-related Hacker News Post. Input your Slack workspace and channel here. Next, click on Connect to give the repo the necessary permissions in Slack.

Click here to see how to create a Hacker News Alert Slack bot in three steps.

That’s it. After that, you will receive a message if the Hacker News Post contains ChatGPT every hour at the 50th minute. Then, you won’t miss any Hacker News Posts related to ChatGPT.

What is the difference between Hacker News RSS and a Slack bot

Compared with Hacker News RSS, one of the advantages of a Hacker News Slack bot is that the bot can be integrated into the SaaS tools you often use. But with Hacker News RSS, you need to install an extra tool to read the RSS feed.

Furthermore, you can also integrate ChatGPT into this Slack bot and ask ChatGPT to summarize all the Hacker News Posts.

If you own a community on Discord, check out the Discord version to monitor Hacker News posts containing the keyword you're interested in and ask ChatGPT to give a summary of each post.

Give it a try now! Join flows.network Discord server to get the latest updates or request some features.

· 3 min read

Discord is a great communication tool for the community. Lots of organizations, companies, and open-source projects use Discord as the home of their community. One of the most famous use cases is Midjounry. Lots of people use Midjourny to generate unbelievable images with the help of a Discord bot. In this article, I will show you how to create a Discord channel bot that can send and receive messages from an external service to a Discord channel. To connect a Discord channel on flows.network, you need two parameters: discord_channel_id and discord_token.

How to get the Discord channel id

Let's get started with channel id, which is much easier. Discord channel id is an 18-digit number.

Each channel has its own unique URL. A standard URL of a discord channel is made up of discord.com/channels/numbers/discord_id. All you need to do is to enter the channel where you want to deploy the bot and copy the last numbers of the URL.

https://discord.com/channels/846973236280950824/846973236280950827
|---channel id-----|

That's how we get the Discord channel id. You can use a Discord channel ID to indicate the channel from which the bot should exit.

How to get the Discord bot token

  1. Go to the Discord Developer Portal You need to log in your Discord account first.
  2. Click on the "New Application" button and give your bot a name.
  3. Then, you will be redirected to the application details page. On the general information page, you can update your app icon, description, tags and other stuff.
  4. Click on the "Bot" tab on the left-hand side of the page. In this page, we need to
    1. Click the Reset Token button to get the Discord bot token. Then save the token carefully, which we will use to build a flow on flows.network.
    2. Open the PRESENCE INTENT, SERVER MEMBERS INTENT, and MESSAGE CONTENT INTENT.
  5. Click on the "OAuth" tab on the left-hand side of the page and click on URL Generator.
    1. On the URL Generator page, select "bot" scope.
    2. Select the "administrator" permission (or select message reading and sending permissions individually as you need).
    3. Copy the bot URL from the GENERATED URL in the bottom of this page. This URL is used to invite your bot to your Discord server after your flow is running successfully.

After you get the Discord Chanel id and Discord bot token, go to flows.network to create a Discord bot, like the ChatGPT Discord server.

Connect the channel id and Discord token with your bot

The easiest way to create a discord bot is to get started with a pre-built template. Let's take the GitHub Issue Tracker template as an example. After you complete the first step: create and build the flow, you'll be redirected to a page where you need to configure the Discord settings. As you can see from the image below, we need to fill in the Discord channel id and Discord bot token.

When you finish all the steps and your flow turns running, you can invite the bot to your server by the bot URL you just got in the previous step.

· 4 min read

flows.nework just released a new version last week. This version comes with Flow Template features that allows users onboard in 3 minutes. We also released new versions of OpenAI integrations GitHub integrations, and flowsnet-platform-sdk.

Integration updates for developers

  1. Upgrade the github-flows Integration to the 0.5.1 version. The latest version includes a new feature called GithubLogin::Default, which automatically identifies the user's unique login account as their GitHub login account. This eliminates the need for users to manually input their personal GitHub account in the code. For an example, please click on the following link: https://github.com/flows-network/github-star-slack-messenger/pull/2/files.
  2. Upgrade the openai-flows integration to the 0.7.1 version. Added let of = OpenAIFlows::new();, which will find the OpenAI key named default. If there is no key named default, the platform will search for other keys. This method eliminates the need for users to specify the key name in the code. Click the link to check out an example.
  3. Add log feature for the flowsnet-platform-sdk integration in the 0.1.4 version. With this feature, users can get more detailed and long-time logs for their flows. Click the link to check out an example.

[Image: Image.jpg]

Introducing template for users

In order to make the process of using flows.network easier for users, we have introduced pre-built flow templates that are popular. You can view these templates on the templates page. We are also working on adding more templates. By using a flow template, you only need to adjust certain settings for your bot and the SaaS integration required for the flow. Additionally, we will create a GitHub repository under your personal account to ensure that you have full control of the source code. Any updates you make to the repo will be automatically built by flows.network.

After deploying a bot from the template, you will have a functioning bot and access to its source code. Let's take a look at how a Flow Template works.

How to deploy a telegram bot from a flow template

Click the template ChatGPT Based Telegram Bot to start. Make sure you have signed in flows.network.

On this page, you can see which template you’re using and you will create a new GitHub repo for yourself. As I mentioned before, to make sure you have the full control of the flow’s code, flows.network will create a GitHub repo containing the template source code under your own GitHub org. Here you can change the repo name. The name by default is the name of the template you used. You can also choose your own repo public or not.

[Image: Image.jpg]If you’re ok with the default setting on this page, just click on Create and Build to create the GitHub repo and build the flow function.

Building the function takes some time, meanwhile let’s configure the SaaS integration required by the flow template meanwhile. Next you will go through the SaaS integrations that you need to configure.

We also need to grant flows.netowork to access OpenAI. Click on Connect if it’s your first time to connect OpenAI. You will be directed to a new page. Here you need to copy and paste your OpenAI key on the API key zone. If you have connected OpenAI, just click on continue button to check out the flow details.

If you already connected to OpenAI and want to add a new one, click on +Add new authentication.

[Image: Image.jpg]

For this ChatGPT Telegram Bot, we need to add a telegram API token from the botfather. After you copy and paster the telegram API token in the configuration section, click on Deploy to deploy you flow.

That’s it. You can see your flow is building. Once the status of your flow becomes running, you can go to the telegram to give the bot a try.

This is how a template works. With a template, deploying a bot is easy and simple. Welcome to give it a try! Feel free to join our Discord server to stay updated or to request a template.